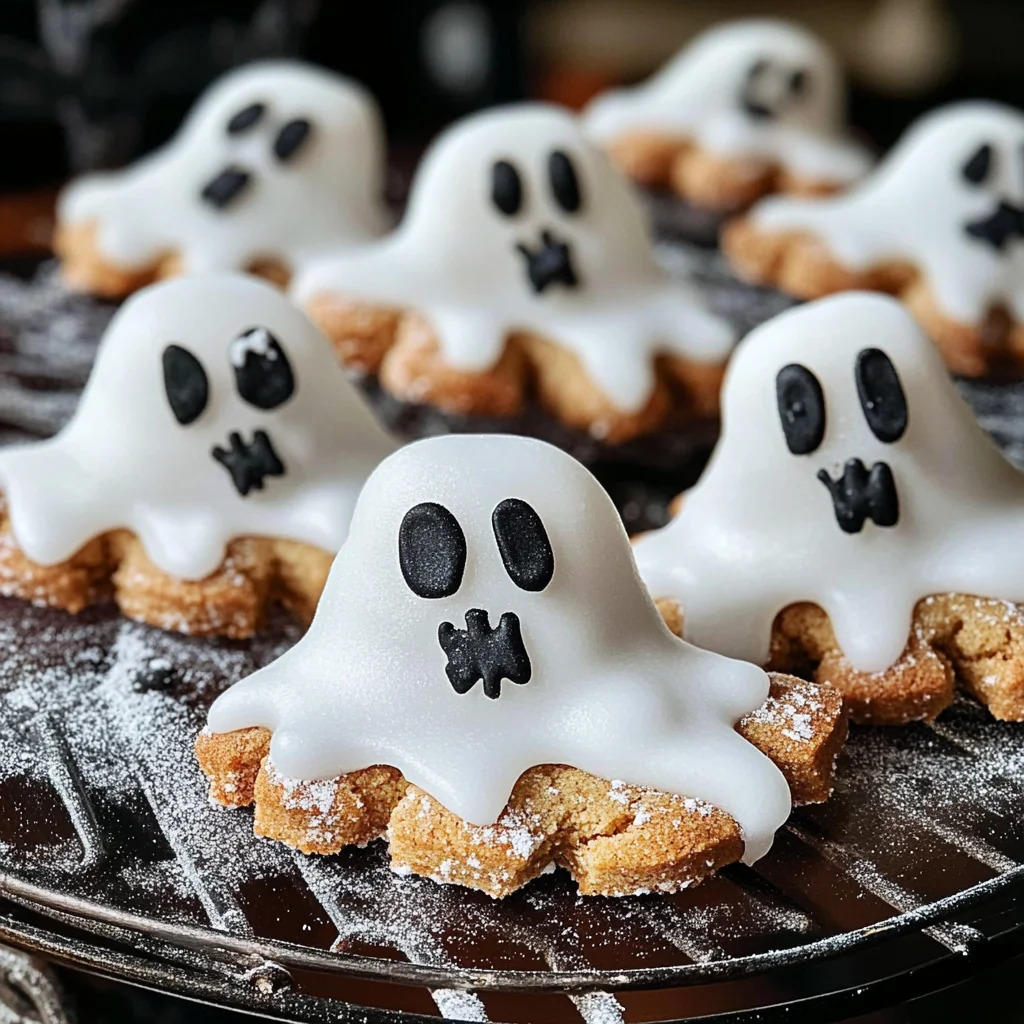
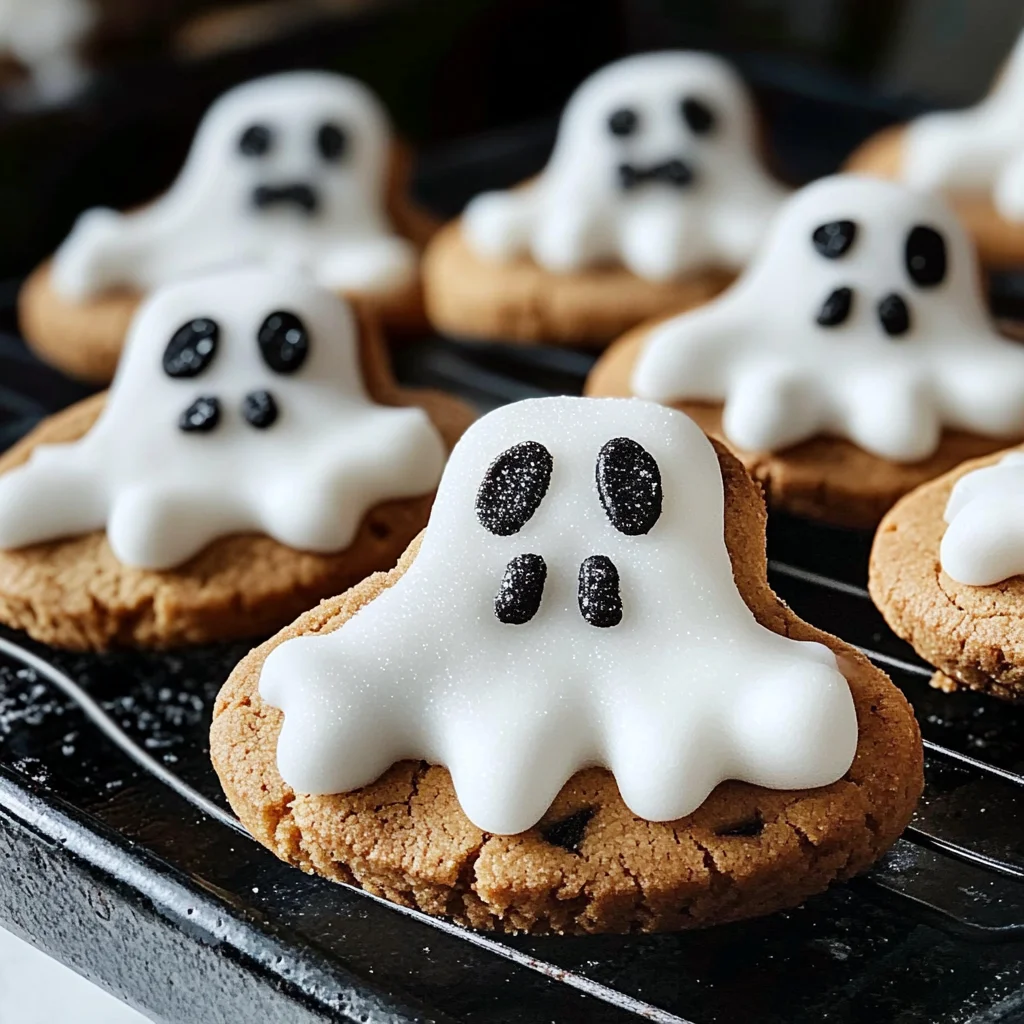
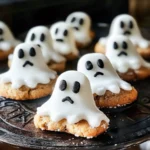
Ghost cookies
Ghost cookies are a fun and easy way to celebrate Halloween. These spooky treats combine delicious chocolate chunk cookies with fluffy marshmallows, making them perfect for parties or festive gatherings. Not only do they look adorable, but they are also quick to prepare, allowing you to whip up a batch in just 25 minutes!
Why You’ll Love This Recipe
- Easy to Make: This ghost cookies recipe requires minimal ingredients and can be prepared in no time.
- Perfect for Halloween: These treats are ideal for Halloween parties or as a fun dessert for kids and adults alike.
- Customizable: You can adjust the decorations on each cookie, making them unique and personal for your celebration.
Tools and Preparation
To create these delightful ghost cookies, you’ll need a few essential tools that will help streamline your baking process.
Essential Tools and Equipment
- Mixing bowl
- Baking tray
- Parchment paper
- Spatula
Importance of Each Tool
- Mixing bowl: A large mixing bowl is essential for combining your icing sugar and ensuring an even coating on the cookies.
- Baking tray: A sturdy baking tray allows you to arrange the cookies without worrying about them breaking during the decorating process.
Ingredients
For the Ghost Cookies
- 175g icing sugar
- 1 x 200g pack chocolate chunk cookies
- 9 marshmallows (regular size)
- black writing icing
How to Make Ghost Cookies
Step 1: Prepare the Cookies
Start by placing your chocolate chunk cookies on a baking tray lined with parchment paper. Make sure they are spaced apart to allow for easy decorating later.
Step 2: Make the Icing
In a mixing bowl, combine the icing sugar with a small amount of water. Stir until you achieve a smooth consistency that will coat the cookies easily.
Step 3: Decorate with Marshmallows
Place one marshmallow on top of each cookie. The marshmallow will serve as the ghost’s head.
Step 4: Apply Icing
Using a spatula, carefully spread the icing over each marshmallow-covered cookie. Ensure it covers the marshmallow completely for that ghostly look.
Step 5: Add Details
Once the icing has set slightly, use black writing icing to draw eyes and mouths on each ghost. Get creative with their expressions!
Now you’re ready to enjoy your spooky ghost cookies!
How to Serve Ghost cookies
Ghost cookies are a fun and spooky treat perfect for Halloween gatherings. These delightful cookies can be served in various creative ways that will impress your guests and add to the festive atmosphere.
On a Spooky Platter
- Arrange the ghost cookies on a themed platter surrounded by fake spider webs or plastic spiders for an eerie presentation.
As Party Favors
- Package each ghost cookie in a small cellophane bag tied with orange ribbon. This makes for a delightful treat guests can take home after the party.
With Hot Chocolate
- Serve ghost cookies alongside warm hot chocolate topped with whipped cream. The combination is sure to delight kids and adults alike!
At a Halloween Bake Sale
- Display your ghost cookies prominently at bake sales during Halloween. They’ll attract attention with their spooky design, making them a top seller.
As Dessert for a Halloween Dinner
- Present ghost cookies as the grand finale of your Halloween dinner. Pair them with some seasonal fruits like apples or pears for balance.
How to Perfect Ghost cookies
To ensure your ghost cookies turn out perfectly every time, consider these helpful tips:
-
Use fresh ingredients: Make sure your chocolate chunk cookies and marshmallows are fresh for the best flavor and texture.
-
Customize icing thickness: Adjust the consistency of your icing sugar mixture. A thicker icing will hold its shape better, while thinner icing spreads more easily.
-
Experiment with decorations: Get creative with your black writing icing. Try different designs or expressions on each marshmallow ghost to make them unique.
-
Chill before serving: Allow the decorated ghost cookies to chill in the fridge for a few minutes. This helps set the icing and gives you a firmer cookie.
-
Store properly: Keep any leftover ghost cookies in an airtight container at room temperature to maintain freshness.
Best Side Dishes for Ghost cookies
Pairing side dishes with your ghost cookies can elevate your Halloween treats even further. Here are some tasty options:
-
Witch’s Brew Punch: A refreshing, spooky drink made from fruit juices and soda, perfect for washing down those sweet treats.
-
Pumpkin Soup: Serve warm pumpkin soup as an appetizer; it complements the sweetness of ghost cookies beautifully.
-
Cheese Platter: Offer a selection of cheeses paired with crackers; savory flavors provide a nice contrast to the sweetness of the cookies.
-
Mummy Dogs: Wrap hot dogs in crescent roll dough and bake until golden brown; these fun snacks add a savory option to your dessert table.
-
Spooky Veggie Tray: Create a vegetable tray arranged like a spooky face using dip for eyes; it adds color and healthy options next to sweet treats.
-
Candy Corn Salad: Make a colorful salad incorporating candy corn, mandarin oranges, and whipped cream for an extra festive touch!
Common Mistakes to Avoid
Making ghost cookies can be fun, but it’s easy to make mistakes that could ruin your spooky treats. Here are common pitfalls to watch out for.
- Ignoring the consistency: If your icing is too runny or thick, it won’t stick well to the cookies. Aim for a smooth, spreadable texture.
- Not using fresh ingredients: Old marshmallows or stale cookies can affect taste. Always check the freshness of your ingredients before starting.
- Overdoing the decoration: Too much black icing can overwhelm the ghost design. Keep it simple and focus on key features like eyes and mouth.
- Neglecting to prep: Failing to gather all ingredients beforehand can lead to interruptions. Set up your workspace with everything you need before starting.
- Skipping chilling time: If your cookies are warm, the icing may melt off. Allow them to cool completely before decorating.
Storage & Reheating Instructions
Refrigerator Storage
- How long: Ghost cookies can be stored in the refrigerator for up to 5 days.
- Containers: Use an airtight container to prevent them from drying out.
Freezing Ghost cookies
- How long: These treats can be frozen for up to 3 months.
- Containers: Place them in a freezer-safe bag or container, separating layers with parchment paper.
Reheating Ghost cookies
- Oven: Preheat to 350°F (175°C) and warm for about 5-7 minutes. This keeps them crispy.
- Microwave: Heat for 10-15 seconds on a microwave-safe plate for a quick warm-up.
- Stovetop: Use a skillet on low heat, flipping occasionally until warmed through.
Frequently Asked Questions
Here are some common questions about making ghost cookies that might help you in your baking adventure.
What are ghost cookies?
Ghost cookies are fun Halloween-themed treats made from chocolate chunk cookies decorated like ghosts using icing and marshmallows.
Can I customize my ghost cookies?
Yes! You can add colored sprinkles, change the cookie base, or use different shapes for marshmallows to create unique designs.
How do I ensure my ghost cookies stay fresh longer?
Store them in an airtight container in the refrigerator or freeze them properly. This helps maintain their freshness and flavor.
Are ghost cookies suitable for kids?
Absolutely! Making ghost cookies is a fun activity for kids during Halloween, allowing them to get creative with decorations.
Final Thoughts
Ghost cookies offer a delightful way to celebrate Halloween with friends and family. Their versatility allows you to customize each treat according to your preferences. Whether you want more spooky designs or different flavors, these cookies are sure to impress anyone who tries them. Give this recipe a go and enjoy creating these festive delights!
Ghost Cookies
Ghost cookies are the ultimate festive treat to celebrate Halloween! These adorable, spooky delights combine rich chocolate chunk cookies with fluffy marshmallows, creating a fun dessert that is both delicious and visually appealing. Perfect for parties or family gatherings, you can whip up a batch in just 25 minutes. The best part? Each cookie can be personalized with unique decorations that will charm kids and adults alike. With simple ingredients and easy-to-follow instructions, making these ghostly treats is a delightful way to get into the Halloween spirit!
- Prep Time: 10 minutes
- Cook Time: 15 minutes
- Total Time: 25 minutes
- Yield: Approximately 9 servings (cookies) 1x
- Category: Dessert
- Method: Baking
- Cuisine: Halloween
Ingredients
- 175g icing sugar
- 1 x 200g pack chocolate chunk cookies
- 9 regular-size marshmallows
- Black writing icing
Instructions
- Preheat your oven if needed, and line a baking tray with parchment paper.
- Place the chocolate chunk cookies on the tray, spaced apart for easy decoration.
- In a mixing bowl, combine icing sugar with a small amount of water until smooth.
- Place one marshmallow on each cookie to represent the ghost's head.
- Spread the icing over each marshmallow-covered cookie, ensuring complete coverage.
- Once set slightly, use black writing icing to create eyes and mouths for your ghostly figures.
Nutrition
- Serving Size: 1 ghost cookie (approximately 30g)
- Calories: 130
- Sugar: 12g
- Sodium: 50mg
- Fat: 5g
- Saturated Fat: 2g
- Unsaturated Fat: 2g
- Trans Fat: 0g
- Carbohydrates: 18g
- Fiber: 0g
- Protein: 1g
- Cholesterol: 0mg