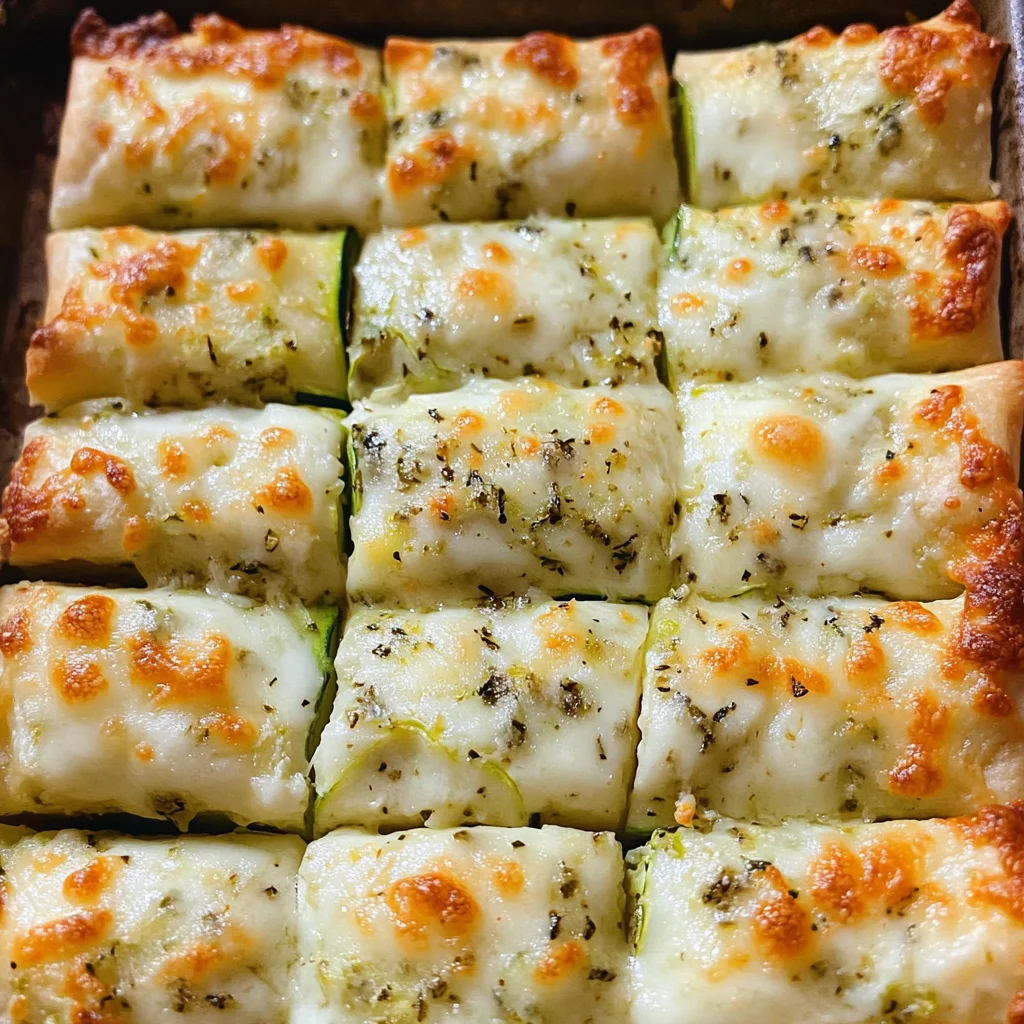
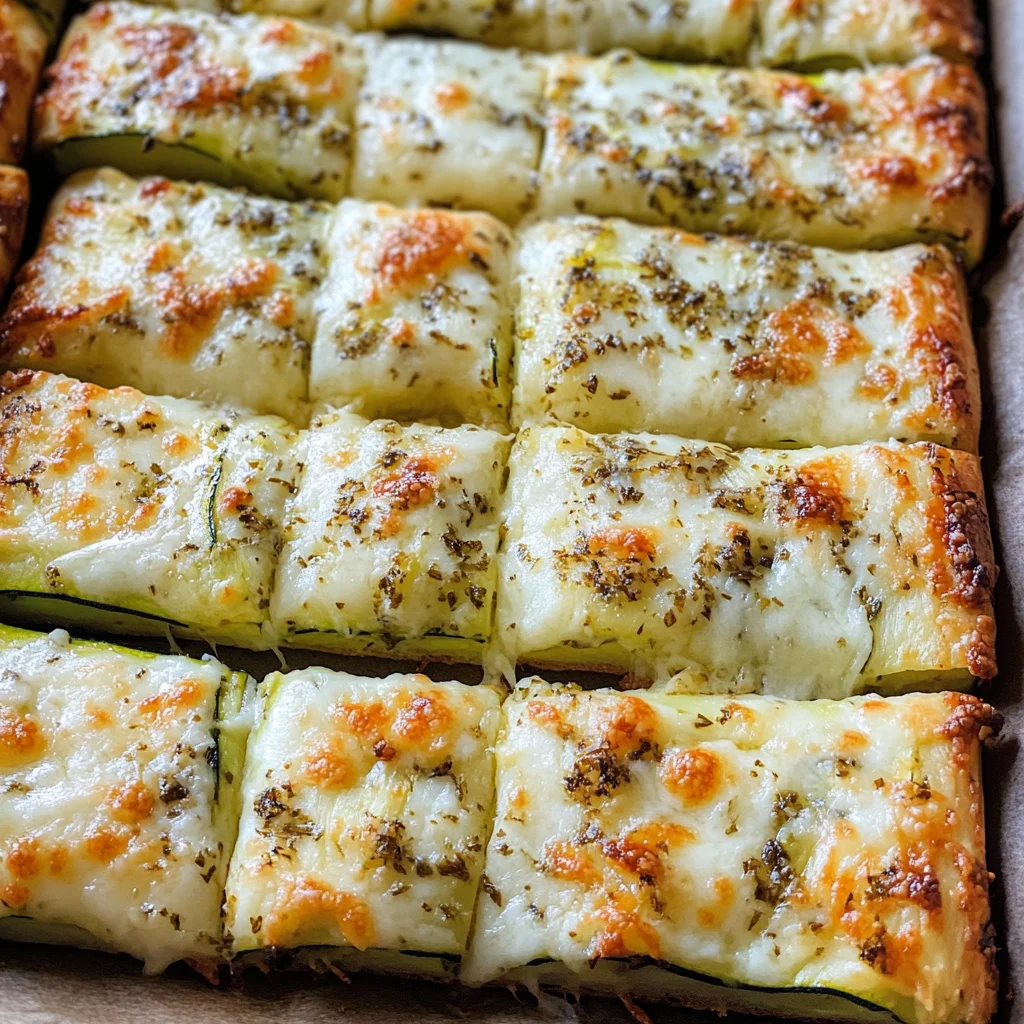
Cheesy Zucchini Breadsticks
Craving cheesy bread but looking for a low-carb option? These Cheesy Zucchini Breadsticks are perfect for you! They provide a delightful cheesy flavor while keeping your nutrition on track. Whether you’re serving them as an appetizer, a snack, or even a side dish, they are sure to impress family and friends with their unique taste and texture.
Why You’ll Love This Recipe
- Low-Carb Delight: These breadsticks are perfect for Keto or low-carb diets while still satisfying your cheesy cravings.
- Quick and Easy: With just a few steps and minimal prep time, you’ll have cheesy goodness in no time.
- Versatile Snack: Enjoy them as an appetizer, side dish, or even paired with your favorite dips.
- Nutritious Ingredients: Made with wholesome ingredients like zucchini and cheese, they’re both tasty and nutritious.
- Customizable Toppings: Feel free to experiment with different cheeses or herbs to suit your taste.
Tools and Preparation
To make these delicious Cheesy Zucchini Breadsticks, having the right tools is essential. Here’s what you need to get started.
Essential Tools and Equipment
- Baking Dish
- Mixing Bowl
- Grater
- Spoon
Importance of Each Tool
- Baking Dish: A proper baking dish ensures even cooking and browning of your breadsticks.
- Mixing Bowl: A sturdy mixing bowl allows for easy combining of ingredients without spills.
- Grater: This tool is key for shredding zucchini finely, which helps achieve the perfect texture.
- Spoon: A good spoon will help you mix all the ingredients thoroughly.
Ingredients
For the Breadsticks
- 4 cup Grated Zucchini
- 1/2 cup Mozzarella Cheese
- 1/3 cup Parmesan Cheese
- 1 Egg
- 1 tsp Garlic Parsley Salt
- 1 cup Grated Cheese of Choice (topping)
How to Make Cheesy Zucchini Breadsticks
Step 1: Prepare the Zucchini
Start by squeezing out as much liquid as possible from the grated zucchini. This step is crucial for achieving crispy breadsticks.
Step 2: Mix the Ingredients
In a mixing bowl, combine the drained grated zucchini, mozzarella cheese, parmesan cheese, egg, and garlic parsley salt. Stir well until everything is evenly mixed.
Step 3: Spread the Mixture
On a lined baking dish, spread the zucchini mixture into a thin layer (about half an inch thick). This helps ensure that the bottom crisps up nicely. Bake at 425°F for 15 minutes.
Step 4: Add Toppings
Once baked, top the crust with your choice of additional cheese (mozzarella or Mexican cheese work great). Return to the oven for another 2-5 minutes until the cheese melts and turns golden brown.
Step 5: Slice and Serve
Remove from the oven and slice into sticks. Serve immediately while hot for maximum flavor!
How to Serve Cheesy Zucchini Breadsticks
Cheesy Zucchini Breadsticks are a versatile treat that can be enjoyed in many ways. Whether you’re serving them as an appetizer or a main course, these delicious sticks can complement various meals and occasions.
As a Snack
- Great for dipping – Serve with marinara sauce or your favorite hummus for a tasty snack.
- Perfect party food – Arrange on a platter for your next gathering, and watch them disappear!
With Salads
- Fresh greens – Pair with a vibrant salad to balance the cheesy goodness of the breadsticks.
- Caesar salad – The creamy dressing and crunchy croutons make an excellent match.
As an Appetizer
- Before dinner – Serve warm as an enticing starter that sets the tone for the meal ahead.
- Game day treats – A perfect finger food for watching sports with friends.
Accompanying Main Dishes
- With grilled chicken – The flavors meld beautifully, making dinner more satisfying.
- Paired with soup – These breadsticks are great alongside tomato or vegetable soup for a comforting meal.
How to Perfect Cheesy Zucchini Breadsticks
To make your Cheesy Zucchini Breadsticks even better, consider these helpful tips. They will ensure you achieve the perfect texture and flavor every time.
- Squeeze excess moisture – Remove as much liquid from the zucchini as possible to avoid soggy breadsticks.
- Use fresh cheese – Opt for freshly grated mozzarella and parmesan for superior melting and flavor.
- Bake on parchment paper – This prevents sticking and makes clean-up easier while allowing even cooking.
- Adjust thickness – Spread the mixture evenly; too thick will result in a soft texture, while too thin may burn.
- Experiment with toppings – Try adding herbs like oregano or crushed red pepper flakes for added flavor.
- Serve immediately – Enjoy them hot out of the oven for the best taste and texture.
Best Side Dishes for Cheesy Zucchini Breadsticks
Cheesy Zucchini Breadsticks pair wonderfully with various side dishes. Here are some options to enhance your meal experience:
- Garden Salad – A mix of fresh vegetables tossed in vinaigrette adds brightness.
- Roasted Vegetables – Seasoned zucchini, bell peppers, and carrots caramelize beautifully in the oven.
- Grilled Chicken Skewers – Marinated chicken cooked on skewers offers protein to balance the cheesy breadsticks.
- Tomato Soup – A warm bowl of tomato soup complements the cheesy flavor perfectly.
- Quinoa Salad – A light salad made with quinoa, herbs, and lemon dressing pairs well with these breadsticks.
- Stuffed Bell Peppers – Filled with grains and veggies, they provide a hearty addition to your meal.
- Coleslaw – A refreshing cabbage salad adds crunch and balances the richness of the breadsticks.
- Garlic Butter Shrimp – Savory shrimp cooked in garlic butter bring an elegant touch to your dish.
Common Mistakes to Avoid
When making Cheesy Zucchini Breadsticks, avoiding common mistakes will help ensure your dish turns out perfectly.
- Not squeezing out excess moisture: Failing to remove the liquid from the grated zucchini can lead to soggy breadsticks. Always squeeze out as much moisture as possible before mixing.
- Using the wrong cheese: Different cheeses melt differently. Opt for mozzarella or a blend that melts well to achieve that gooey cheesy texture.
- Skipping the baking time: If you don’t bake the crust long enough before adding toppings, it may not crisp up properly. Stick to the recommended baking time.
- Overloading with toppings: While it’s tempting to add lots of cheese, too much can make your breadsticks greasy and heavy. Use a moderate amount for best results.
- Not allowing them to cool slightly before slicing: Cutting too soon can cause your breadsticks to fall apart. Let them cool for a few minutes for easier slicing.
Storage & Reheating Instructions
Refrigerator Storage
- Store in an airtight container for up to 3 days.
- Keep separate from any dips or sauces to maintain texture.
Freezing Cheesy Zucchini Breadsticks
- Freeze in a single layer on a baking sheet before transferring to an airtight container.
- They can be stored in the freezer for up to 2 months.
Reheating Cheesy Zucchini Breadsticks
- Oven: Preheat oven to 350°F (175°C). Bake for about 10-15 minutes until heated through.
- Microwave: Heat on medium power in short increments of 30 seconds until warm but be cautious as they can become chewy.
- Stovetop: Heat on low in a skillet, flipping occasionally until warmed through and crispy again.
Frequently Asked Questions
Here are some common questions about Cheesy Zucchini Breadsticks.
Can I use different types of cheese in Cheesy Zucchini Breadsticks?
Yes, you can experiment with different cheeses like cheddar or pepper jack for varied flavors, but ensure they melt well.
How do I prevent sogginess in my Cheesy Zucchini Breadsticks?
To avoid sogginess, always squeeze out as much moisture from the zucchini as possible before mixing with other ingredients.
Can I make Cheesy Zucchini Breadsticks ahead of time?
Certainly! You can prepare the mixture and store it in the fridge prior to baking, or bake them and reheat when ready to serve.
What can I serve with Cheesy Zucchini Breadsticks?
These breadsticks pair wonderfully with marinara sauce, ranch dressing, or a fresh salad for a complete meal.
Are Cheesy Zucchini Breadsticks suitable for freezing?
Yes! They freeze well and can be reheated later, making them a convenient snack or appetizer.
Final Thoughts
Cheesy Zucchini Breadsticks are not only delicious but also versatile. You can customize them with your favorite cheeses and serve them as an appetizer or main dish. They fit perfectly into various meals while satisfying cheesy cravings without compromising nutrition. Give this recipe a try; you won’t be disappointed!
Cheesy Zucchini Breadsticks
Craving a delicious snack that won’t derail your low-carb lifestyle? These Cheesy Zucchini Breadsticks are the perfect solution! With their rich cheesy flavor and satisfying texture, they make an excellent appetizer, side dish, or a delightful snack for any occasion. Made primarily from fresh zucchini and melty cheeses, these breadsticks are not only easy to prepare but also versatile enough to suit any palate. Enjoy them warm straight from the oven with your favorite dips or serve them alongside salads and main dishes for a well-rounded meal. These Cheesy Zucchini Breadsticks will impress family and friends while keeping your nutrition on track!
- Prep Time: 10 minutes
- Cook Time: 20 minutes
- Total Time: 30 minutes
- Yield: Makes about 12 breadsticks 1x
- Category: Appetizer
- Method: Baking
- Cuisine: American
Ingredients
- 4 cups grated zucchini
- 1/2 cup mozzarella cheese
- 1/3 cup parmesan cheese
- 1 egg
- 1 tsp garlic parsley salt
- 1 cup grated cheese of choice (for topping)
Instructions
- Preheat the oven to 425°F (220°C).
- Squeeze out excess moisture from the grated zucchini.
- In a mixing bowl, combine the drained zucchini, mozzarella, parmesan cheese, egg, and garlic parsley salt. Mix until well combined.
- Spread the mixture evenly in a lined baking dish to about half an inch thick.
- Bake for 15 minutes until lightly golden.
- Remove from the oven and sprinkle with additional cheese topping; return to bake for an additional 2-5 minutes until melted and bubbly.
- Let cool slightly before slicing into sticks and serving warm.
Nutrition
- Serving Size: 1 serving
- Calories: 150
- Sugar: 3g
- Sodium: 300mg
- Fat: 9g
- Saturated Fat: 5g
- Unsaturated Fat: 4g
- Trans Fat: 0g
- Carbohydrates: 8g
- Fiber: 2g
- Protein: 10g
- Cholesterol: 70mg